For General Inquiries:

Gifting Policies: 

Collaborations: 


123 Street Avenue, City Town, 99999

(123) 555-6789

email@address.com


You can set your address, phone number, email and site description in the settings tab.
Link to read me page with more information.

Blog

Sportswear isn't sportswear anymore...

Pamela Allier

Midweek greetings from Mexico City my loves! Today, we're talking about using sportswear on your outfits without looking like a gym rat (or worse)...

Well, I guess you already know summer is over and we're all into the new season. Thicker materials such as wool, flannel, cashmere and of course LAYERS! (hoodies included) Now, I get asked a lot, if adding sportswear to our daily outfits is fashionable or not. IMOP (in my honest opinion) it is absolutely fashionable... it's just a matter ofkeeping an eye on some important guidelines I'd happily share with you for free, ha!

1. Absolutely never use an all-sportswear outfit if you're not on-route to the gym. If you're on an all-Nike outfit, you better be sweaty!

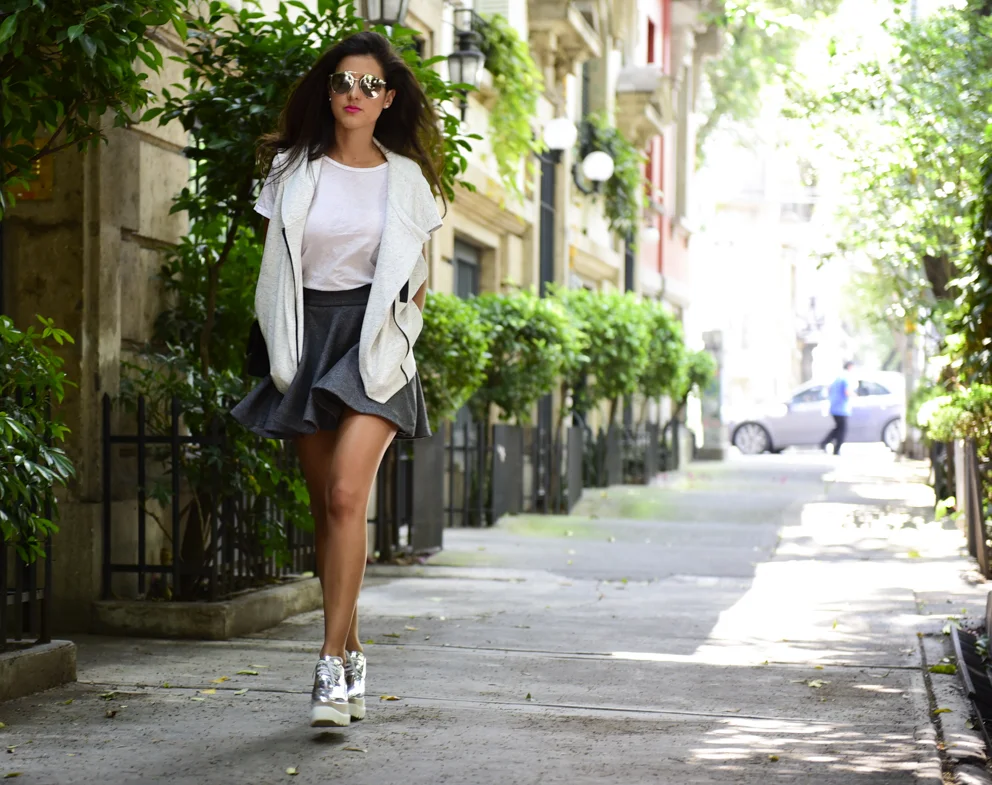
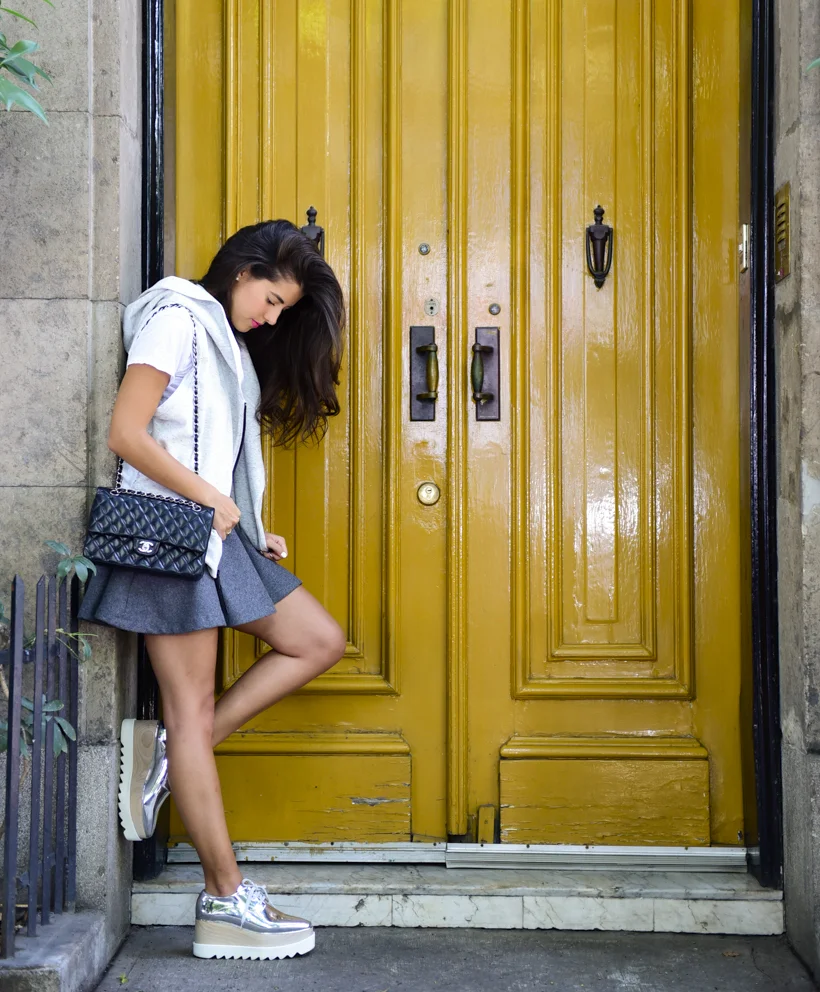
2. Try adding a sportwear piece to a not-so-sporty outfit. Maybe chic kicks and a cool dress, pumps and a hoodie just as the one I'm using or simply adding a nice baseball cap to your denim and white-t outfit.

3. Less is more.

This time, for me it was only this hoodie. It's comfy and an unexpected match for my I'm-in-an-Ivy-League-collage flannel skirt (one of my all-time faves) and my show-me-the-bling Stella's. Of course most of my outfits include shades... and now I'll add a number 4 to the list: NEVER USE VOLEYBALL SHADES UNLESS YOU'RE PLAYING VOLEYBALL... or if course, you get them prescribed by your eye-doc...

Well, that will be all for today loves...I really hope you find me useful and helpful, haha and just for the record, you can always think in an extremely different way than me, and it's absolutely fine, fashion is all about that. Having your opinion and defining your own style.


Ya estamos en "enero" de los que nos gusta la moda, y septiembre no solamente promete ser un mes con mucha actividad, sino también con muchas sopresas y noticias para todos.

Hoy quiero platicar con ustedes sobre un tema que me han preguntado algunas de ustedes... y como siempre lo digo, esto es mi opinión, ok? Hoy, más que nunca, incorporar ropa deportiva a nuestros outfits diarios es una tendencia a nivel mundial; pero, ¿lo debemos hacer nosotros o no, y cuánto? Bueno, si ven mi blog y mi Instragram, se darán cuenta que yo lo hago bastante, pero siempre trato de mantener algunas reglas para no parecer que acabo de salir de hacer gimnasio una hora y media (a menos que efectivamente haya ido al gimnasio una hora y media, jaja)...

1. Nunca traer el outfit completo de hacer ejercicio, si no planeamos hacer ejercicio. No digo que pants y sudadera no, sino leggins, y playera de gimnasio... me entienden? Si traemos un outfit 100% del gym, más nos vale estar sudados o rumbo a sudar, jaja.

2. Empezar por añadir una sola pieza deportiva al outfit. Unos tenis con un vestido o falda; tacones con sudadera, gorra con jeans por ejemplo.

3. Mantener la simpleza. Hay belleza en la simpleza, y a veces usar gorra de un equipo de basketball, sudadera de la selección de fútbol, y pants del equipo de volley de la secundario no se ve nada bonito.

Como pueden ver en las fotos, para esta publicación decidí incorporar una sudadera gris al conjunto. Con una falda de lana ya 100% de la temporada otoñal, tenía dos opciones: o usar tenis o usar una sudadera deportiva, y como ya me han visto mucho con tenis, decidí ahora usar una sudadera que por cierto está deliciosa y la he usado mucho más de lo que me imaginé. Por último quiero hacer un comentario sobre los lentes... ya saben que los adoro y me encantan, pero por favor. NUNCA usen unos lentes tipo de ciclista o de jugador de voley de playa si no están practicando ese deporte. Hay lentes a precios muy accesibles que los van a ayudar a verse mejor... les prometo

Me despido y les mando un beso, Pam.


Hoodie: Nike // Skirt: Zara // Tshirt: Madewell // Silver Britt Shoes: Stella Mcartney // Shades: Dior

Easy 12 step makeup

Pamela Allier

Hello my dears!!! To continue our journey together in the "Beauty Parlor" section, today we'll go through an easy 12-step make up that will get you ready for the Red Carpet. Are you ready for the best 10 minute beauty routine of your life?

Everyone loves when we have at least an hour or so for the makeup process, but what happens when we only got 10 minutes? This 12 step process might just be the answer:

  1. Use the Makeup Teint Couture Blurring Foundation. This foundation is one of my top favorites; glides easily when applied. 
  2. Eye Corrector. Yes, it always helps. 
  3. Givenchy Prisme Libre powder. It will make the whole make up last at least 8 hours. Remember the foundations are always the most important part when building anything. 
  4. Eyeshadows
    • A three toned eye-shadhow is what you want, and the order is extremely important 
    • The medium tone goes first and it must be applied in the middle section of the eyelid
    • Then goes the darker color, and it goes on the farthest part (from the nose) of the eye. The dark color gives the depth to all of it.
    • At last, we apply the lighter color. It gives light to the whole ensamble and it must be applied to the eyelid in the nearest part to the nose.
  5. Eyeliner With darker tone in the lower part of the eyelid
  6. Liner Always apply the eyeliner in two steps: from the ends to the middle of the eye 
  7. Put  Eyeliner in the lower part of the eyelid. Always apply in the outside part of it.
  8. Eyebrows: this might be the best tip ever. If you don't have those Cara Delavigne eyebrows, a Eyebrow pencil might be the solution. 
  9. Mascara: Lots of it in deep black. 
  10. Powder: Some blush in your cheekbones... never to much, never too little.
  11. Lip Liner Think as of drawing a heart. As with the eyes, we must do it in two steps. From the middle to the farthest part. 
  12. Lipstick The tone and color depend on your intentions, haha. Killin' it red, or hug me pink. 

I must make a confession. This will not take you 10 minutes the first time, but as everything important  in life, it all takes time to master it. Master this and you might be in a red carpet soon enough. 

Givenchy Products


Lots of Love,

Pam


Espero se encuentren muy bien. El día de hoy quiero compartir con ustedes algo que se llama "Maquillaje Flash de Givenchy". Es muy fácil y sencillo y lo pueden probar ustedes en casa con los productos que ya tengan, o bien comprando los de la marca que por cierto están increíbles.

Aqui abajo les dejo estoy sencillos 12 pasos para lograrlo. La idea de este maquillaje es algo muy sencillo y natural y que no nos tome más de 10 minutos, porque a veces no tenemos más de 12 minutos, ¿o si? Asi que espero les guste y sirva:

  1. Aplicar su base de Maquillaje. Siempre la base es lo más importante. Bien distribuido en toda la piel.
  2. Corrector de Ojos (aplicar unos puntitos y luego sellar con movimientos circulares). Ayuda bastante para ocultar las ojeras y eso que no nos gusta que se vea.
  3. Polvo Traslúcido, este ayuda a sellar nuestra base y que así nos dure mucho más.
  4. Las sombras: muy importante para darle ese toque fino a los ojos; aquí les van algunos tips sobre como aplicarlas. Se debe de aplicar ya sea con brocha o con los dedos con golpecitos suaves y movimientos circulares.
    • El color medio va en la mitad.
    • El color obscuro para dar profundidad al ojo y siempre va en la parte externa
    • El color claro para dar luz. Va en la parte interna del parpado
  5. Aplicar delineador en la parte inferior del ojo con sombra obscura. 
  6. Delinear el ojo el dos partes: 
    • de afuera a la mitad (gran tip)
      • de adentro a la mitad
  7. Delinear por fuera la parte de abajo del ojo. (tip: toque de luz en el lagrimal da apertura al ojo puede ser sombra).
  8. Peinar y rellenar la ceja con sombra obscura o lapiz de cejas. Para todas aquellas que no tenemos ceja tipo Cara Delavigne. 
  9. Rímel en las pestañas. Negro, que haga ver más grandes nuestros ojos!
  10. Aplicar Blush en el hueso de los pomulos. (Tip: No aplicar tan cerca de la nariz porque da efectos de cara redonda). Solamente en la parte externa de la cara. 
  11. Delinear labios. Primero el corazón y la parte central inferior luego unir los extremos.
  12. Labial: el color depende de sus intenciones, jaja. Rojo, rosa, o tonos más otoñales. 

Tengo que hacerles una confesión: la primera vez que probé este método no me tomó diez minutos naturalmente. Pero como todo en la vida es cuestión de práctica, cada vez que lo he intentado mejoro en tiempo en calidad. Lo importante de esto es que cada vez seamos más prácticas y más buenas... y para esto únicamente existe hacerlo una y otra vez. 

Productos Givenchy


Les mando besos,

Pam

Blue paradise: Maldives

Pamela Allier

Hello my loved ones! Today, we start a new section on the blog and it's called: "I know what I want". This new sections is all about the things we love, we dream of, and those of which we're grateful for. We live in a world where it all happens so quickly, and we rarely take time to stop and enjoy those tiny pleasures and blessings we have in our lives. So yes, this might be our "it's OK to dream" section. But guess, what... for me, dreaming not always means spending a lot of money: an evening with friends, a cup of coffee, hugging both of my parents, watching a beautiful sunset and of course, some more "material" things such as buying a black birkin someday. So scroll down to get started with this new section.

I'll tell you guys that I can hardly imagine one day I don't dream of the sunny blue skies and fifty shades of blue of the Maldives. As many of you know, I got married about two years ago, and hubs and I got the chance to visit this paradise on our honeymoon. Undoubtedly, Maldives will always have a special meaning to me, and to be honest, I know what I want: return to Maldives someday. It's the lovely people, it's the blue over blue over blue, it's more than one thousand islands, it's the white sugarly-like sands and of course, all the memories of our honeymoon. I really don't know If I'm going to be able to return to the Maldives... I went there once and I'm forever grateful for that, and the Maldives will always be in my "it's OK to dream" section of my mind.

Qué tal mis queridos, hoy me da gusto contarles que decidí empezar esta nueva sección en el blog que se llama "I know what I want" o algo así como el rincón de "soñar no cuesta nada". Disculpen que me ponga un poco filosófica, pero vivimos en un mundo donde no paramos. Estamos con más actividades que nunca y dejamos poco espacio para la reflexión, y sobre todo, ser agradecidos por lo que tenemos. Esta sección no pretende ser la esquina de "lo siguiente que me quiero comprar", o "el siguiente lugar que quiero visitar". Claro, habrá publicaciones así, porque siempre es bonito soñar, pero también va a incluir intangibles e incomprables como por ejemplo: una tarde con amigos, un bonito atardecer, un sábado de no quitarse la pijama, jaja. Ahora, les advierto que esta sección también tendrá cosas como: una bolsa Birkin negra, un vestido Valentino rojo, un viaje a París con mi esposo, asistir a un desfile Chanel, Dior, Saint-Laurent o cosas así, porque como les dije antes, soñar no cuesta nada.

Estas son algunas de las ideas que tengo para esta sección, y hoy, para inaugurar, quiero platicar un poco sobre las Maldivas. Ya tuve la bendición y el regalo de poder ir ahí en mi luna de miel, y será algo que nunca olvidaré y dejaré de estar agradecida. Fue la calidez de la gente, la arena casi blanca, el cielo azul, la comida, los cientos de tonos azules y verdes del mar, y por supuesto, pasar unos días ahí con mi marido fue algo de lo más bonito que me ha pasado en la vida. Ahora, debo confesarles que Maldivas para siempre será un sueño para mi,  porque por supuesto, quiero regresar, así que este lugar ocupa en mi corazón y en mi mente el primer rincón de "soñar no cuesta nada" porque es bastante seguido que sueño (casi diario, jaja) con poder regresar...y si no puedo, con estas fotos que tomamos del paraíso me conformo.

Con esto me despido, pero los invito a que si quieren comentar abajo sobre lo que quieren o les gusta lo hagan; ya saben que me encanta escuchar su opinión.

Me despido y les mando un beso, Pam.